When you make the jump from milky way or landscape astrophotography to deep space astrophotography, you’re going to need longer focal length optics and something to counteract the rotation of the earth.
Star trackers are the most cost effective way of going about this, and they also offer advantages over to go-to mounts in that they are incredibly portable and some run solely on batteries that you can find at any convenience store.
There are some trade offs however and the biggest one is that star trackers will not frame an object for you like a go-to mount will. You will have to manually frame these targets yourself, most of which you can’t see with the naked eye.
This can be very challenging at first, but luckily there are strategic ways to make the process much easier, which is what I am going to discuss in this article.
Table of Contents
Why Don’t Star Trackers Have the Ability to go to an Object?
Go-to mounts are motorized on both the right ascension and the declination axis. Because of this they have the physical ability to “go-to” an object in the night sky by entering the objects coordinates in to either the hand controller or computer software.
This differs from star trackers which are only motorized on the right ascension axis, which means that they can not physically go-to a specified object. Star trackers can be guided much like go-to mounts can, but in this case they will only be guided on the RA axis.
In recent recent developments and firmware updates, the star adventurer in particular also has the ability to dither without the addition of computer software which I discuss in the article titled “How to Dither Without Guiding”.
Examples of Popular Star Strackers
- Skywatcher Star Adventurer Pro
- iOptron Skyguider Pro
Method 1: An app of the night sky and a red dot finder
There are tons of different apps out there that will show you a live view of the night sky but my personal favorite is Sky Guide.
The reason I like this app so much is that you can hold it up to sky and get a virtual rendering of all of the stars and constellations. You can even fast forward time to figure out when a specific target is going to be in your field of view and near its zenith, based on where you plan on setting up your equipment.
I know this app is available in the app store for the iPhone and I believe its in the Android marketplace as well. If not there should be plenty of alternative options out there that are just as effective.
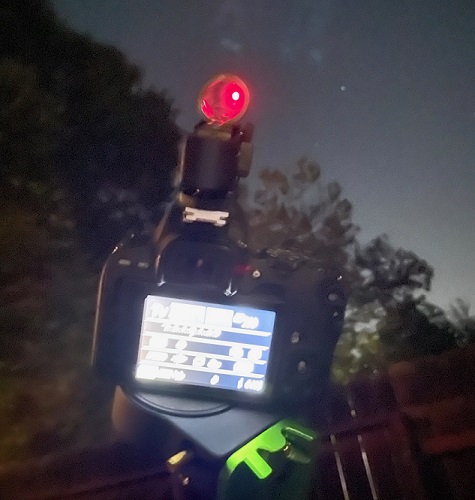
The next piece of equipment you will want is a red dot finder that mounts to the hot shoe of your dslr. These are relatively inexpensive on Amazon and will make your life exponentially easier when it comes to framing, because you can see exactly where you are pointing before you start taking test shots.
When it comes time to frame your object you first want to familiarize yourself with where it is in the sky and where it should be relative to some of the brighter stars that you can see with the naked eye.

After you’ve done this all you need to do is use a bit of trial and error, taking some test shots and moving the positioning of the two axis on your tracker until your object appears in the frame.
Bright targets like Andromeda and the Orion Nebula will be unmistakable and you will know right away when you have them in frame.
You may have a difficult time getting fainter objects to show up on screen.
Especially those that require dual narrowband filters to image.
If you are going for fainter objects, you may need to rely on plate solving.
You don’t technically need dedicated software installed on your computer to plate solve, instead you can take a test shot and upload it to Astrometry.net. It will not only plate solve an image but fully annotate it for you as well.
If your object isn’t in frame, at least you will have a general idea of how far off you are based on the coordinates of the image you took and the coordinates of your target.
There are two downsides to using Astrometry.net on the fly. The first is that if you aren’t controlling your camera with computer software, you have to somehow get that test shot off of your camera and uploaded it to the website.
Some modern dslrs have WiFi that will allow you to quickly transfer images to a phone or a computer which may be a good option if you have one of those cameras. Others have also suggested that taking a picture of your camera screen with your phone will work, but I haven’t verified this.
Even if either of these processes work to upload your images, the second downside is that Astrometry.net is slow.
It often takes several minutes or longer to plate solve and annotate an image and while it’s an incredible free tool, its probably not the best use of your time to do it this way.
It also requires that you have an internet connection whereas dedicated plate solving software does not, since the star database is already downloaded and installed on your computer.
Method 2: NINA and a Red Dot Finder
This is a very similar method but instead it expedites the plate solving process and makes it much quicker to move towards and frame your target.
NINA is a free piece of image acquisition software that has native support for most Canon and Nikon cameras according to their site here:
Requirements – Nighttime Imaging ‘N’ Astronomy (nighttime-imaging.eu)
So if you are using either of those brands you should be in good shape.
NINA also works seamlessly with many different types of plate solving software such as my personal favorite ASTAP.
If you would like to learn more about what plate solving is, refer to my article titled “What is Plate Solving?”
ASTAP solves my images in NINA in literally seconds so if you take the time to get the software in order and control your camera with NINA, you could quickly close in on your target this way.
Essentially all you would need to do is point your camera in the general area of the target, plate solve to find out where you are pointing, adjust your camera positioning, and repeat until the target is in frame.
I would also recommend taking some time to plan your imaging session beforehand, and to get the proper RA and Declination coordinates for your framing.
Telescopius has been my go to for this for quite some time now and their telescope simulator tool is free on their website: Telescope Simulator (telescopius.com)
Enter the focal length of your lens or telescope, the sensor size of your camera, and search for the target you want to image. Drag the square around until you have the framing that you want, and note the coordinates at the bottom.

Conclusion
Star trackers are a great way to transition from wide-field to deep space astrophotography.
Their benefits also come with trade-offs and framing your desired target can be the biggest challenge in using one.
Proper planning is the key to making this easier and there are a couple of different methods that will make this task less daunting.
A red dot finder paired with an app to show the positioning of your target is one of them, and will help tremendously if you aren’t ready to get software involved.
If you are willing to put in a little bit of extra work ahead of time, plate solving has proven to be the best way to quickly find and frame your target in the night sky, even if you aren’t using a go-to mount.
1 thought on “How to Frame Your Target With a Star Tracker”
Comments are closed.