If you are currently using guiding equipment for astrophotography, chances are you are familiar with the software PHD2.
PHD2 is a widely used piece of guiding software that helps smooth out the inherent error in your mounts tracking ability. What it essentially does is monitors one or more stars in the sky and sends periodic corrections to your mount, allowing you to maintain pinpoint stars over very long exposures.
That’s the idea anyway, but especially if you are new to guiding there may be a few kinks to work out, and the name PHD2 which stands for “press here dummy” may overstate the simplicity of the software a bit.
If this is your first run at guiding, you might find yourself incredibly frustrated and wondering why your RMS error is so high. In this post I am going to talk about several different things that you can do to improve PHD2 guiding, and keep more of your sub exposures on those clear nights that can be so very few and far between.
Table of Contents
Check your guide scope and camera sensor settings
When it comes to entering settings for PHD2, one thing that you should understand is that PHD2 is only concerned with the information that it needs to know and with the equipment that’s relevant to guiding.
Unless you are using an off-axis guider the only information PHD2 needs to know is the focal length of your guide scope, and the pixel size of your guide camera rather than the equipment you are using for your actual imaging. (If you are using an off axis guider, enter the focal length of your main telescope adjusted for any focal reducers.)
If you wanted to (for some odd reason) you could mount only a guide scope and camera to the saddle of your mount and guide a star with PHD2 with no main telescope, and PHD2 wouldn’t know or care.
I think it’s important to understand this when you are setting up a new profile in PHD2 because if you mistakenly enter the pixel size of your main camera, or the focal length of your main telescope when you are using a separate guide scope, it’s going to cause big issues with your guiding.
I’ve seen this happen more times than I can count and it’s an easy win when it comes to improving your guiding. When in doubt, go back and check those settings and correct them accordingly.
The guide rate in PHD2 and your ASCOM software need to match
I use the word ASCOM software because this isn’t necessarily the same as your image acquisition software, I.e. NINA, APT, SGP etc.
If you are using a Synta mount whether that be Skywatcher, Celestron, Orion, etc. You will likely be using EQmod as the ASCOM software to control your mount. If you are using an iOptron mount, then you will be using what they call Commander for mount control.
These control panels will each have settings for your guide rate, which is separate from the guide rate setting in PHD2.
Let’s use a hypothetical example and say that you are using Commander, with NINA as your imaging software and PHD2 as your guiding software.
You set your guide rate to .5x and PHD2 and it says the same thing in NINA so you assume that everything is correct. In most cases they will often match right off the bat because your imaging software will pull the settings directly from PHD2, without consideration for your guide rate setting in your ASCOM software.
What you would want to do in this case, is open the Commander control panel and make sure the guide rate correctly matches whatever you’re seeing in PHD2 and NINA. .5x is typically the guide rate that you will want to set for both.


Do a proper calibration
Before you start guiding with PHD2 you need to do a proper calibration. By default, the software should remember this calibration next time you start it and is not something that you need to do every time unless you have disconnected any of your equipment.
To calibrate you will want to first slew your mount to Dec 0 which is the intersection of the meridian and the celestial equator.
Using Stellarium is a great way to do this, simply find a star that’s close and slew your mount to its corresponding RA and Declination coordinates. Before you begin the calibration it’s a good idea to slowly slew North just a bit to clear out any declination backlash.
This can be done on very low speed so that it doesn’t change where you are pointing in any significant way.
Let PHD2 auto select a star, and then hold Shift while you click on the guiding cross hairs to begin the calibration.

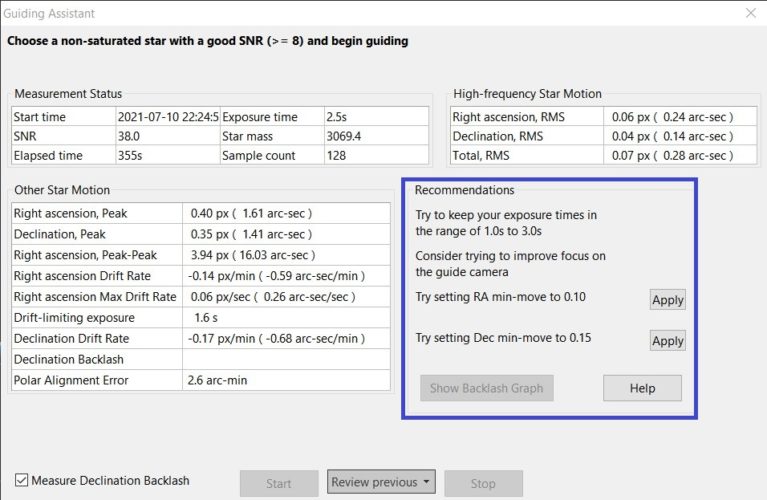
Use the guiding assistant
Unless you are using a very high-end mount chances are that you are going to have some declination backlash right out of the box.
Luckily this is something that PHD2 manages well via its backlash compensation feature that’s built in to its software. Unless you have fantastic guiding without having to do this, I would always recommend running the guiding assistant and taking the suggestions that it provides.
Note that you should make sure that you have turned off any type of backlash compensation that is built in to your mount’s drivers beforehand.
To do this you will want to start guiding after the calibration and go to the top of the menu bar and run the guiding assistant. Make sure that “measure declination backlash” is checked and let it run for a while, I would recommend no less than 5 minutes before you stop it.
Once it is finished it will tell you how much backlash there is in your declination axis.
Because it’s too easy to stress about this number, I won’t even get in to what’s considered high and what’s considered low. In my personal experience the backlash compensation will correct whatever backlash you have so long as it isn’t indicating that your mount has mechanical issues, or recommending that you guide on one axis only.
If it does, I would try recalibrating and running it again.
Once this is finished it will recommend a couple of different things.
- The amount of backlash compensation to apply
- The suggested settings for minmo on both the RA and the Dec
I will likely cover these in another discussion but I would apply all of them.

Check your seeing
It’s a clear night and there’s not a cloud in the sky but for some reason your mount just isn’t performing the way that it usually does and your RMS error is all over the place.
It’s quite possible for the skies to be clear, but for the seeing conditions to be less than ideal. Seeing is not the same thing as visibility, it’s a gauge of the level of turbulence in the earth’s atmosphere.
If the atmosphere is turbulent, it’s going to be very taxing on your guiding as it makes it much more difficult for PHD2 to accurately monitor the stars. In this case you are “seeing limited” and it’s not necessarily the fault of the mount.
Bad seeing is sometimes visibly apparent if you look up and notice that the stars are twinkling. Another easy way to assess the seeing is with a couple of different apps, the ones I use are Astrospheric and MateoBlue.
These tools are both available on the web as well without having to download an app.
Change the length of your exposures
If seeing is less than ideal, it doesn’t mean that you need to pack up your gear right away.
One thing that you can do to average out the seeing is to lengthen your exposures. If your current exposures are only 1.5 seconds, try moving it up to 2 or 2.5 seconds.
I’ve noticed big improvements in guiding by doing this and find that it’s a good practice to just leave it there regardless of seeing conditions.
Check your equipment for cable snags
Does your set up consist of a telescope surrounded by a rat’s nest of cables dangling everywhere, just begging to be snagged?
Poor cable management can also be a cause of sub optimal guiding, especially if cords that are required for power are hanging from the mount down to the ground.
The weight of these cords does add up, and as the mount rotates the cords will shift. These cords moving around could cause your guiding error to increase especially if one of them snags on the leg of the tripod or something else on the mount.
Check your polar alignment
I usually say not to worry about your polar alignment very much when you are guiding because being slightly off isn’t going to dramatically impair your guiding.
When I eyeball my polar alignment through the polar scope, I get a polar alignment error of about 4 arc minutes.
How do I know that? Because I checked it using the guiding assistant as I mentioned above. When you start deviating much more than that say to 10+ arc minutes in error, that’s when you may start to see a higher than normal RMS error.
This could have a couple of different causes. If you are using the polar scope to align and you are sure that you did it correctly, your polar scope itself may need calibrating which I will cover in another topic.
If you used software to align such as Sharpcap, there may have been a setting wrong.
I was approached by someone recently who said he used Sharpcap to align and had a very high RMS error. I asked him to run the guiding assistant and send over a screenshot, as it turns out his polar alignment error was 200 arc minutes, and the guiding error quickly went down to normal levels after he adjusted his polar alignment. Sometimes gremlins in your software are the underlying cause of frustration and you need to do what your IT department tells you do when you call in, power off and power back on.
Create a new profile
For whatever reason, sometimes starting from scratch and creating a whole new profile for your equipment in PHD2 ends up being the magic bullet for persistent bad guiding.
I’m not sure if this is because an unidentified setting is wrong somewhere or just a quirk of PHD2 in general, but if all else fails just create a new profile.
I have heard of this completely fixing guiding issues for many people.
Conclusion
PHD2 is designed to be incredibly easy to use with just the click of a button, and it is once you understand how the software works and make sure that you have the essential settings correct.
The most common issues are typically the easiest fixes and those are making sure the guide scope focal length, guide camera pixel size, and the guide rate settings are all correct.
The rest just comes down to making sure you get a good calibration, assessing the level of backlash in your mount and letting PHD2 apply the proper compensation settings.
Do your best to plan your imaging session ahead of time being mindful of seeing conditions, and practice proper cable management.
When troubleshooting, the guiding assistant is your best friend. Unless you have the best guiding anyone has ever seen you are doing yourself a disservice by not using it.
1 thought on “9 Tips on How To Improve PHD2 Guiding”
Comments are closed.