Did you recently purchase your first astrophotography rig and a guiding setup?
Does your guiding graph in PHD2 look more like it’s monitoring your pulse instead of your guiding?
If so, then what I am about to cover is right up your alley.
In reality, PHD2 is pretty simple to use, but getting it set up correctly involves a little more than a simple click of a button.
In this post, I will explain what you need to know to properly calibrate the software before guiding the first time.
I’m also going to talk about how to troubleshoot common issues that are the main culprit of a failed calibration and bad guiding in general.
Table of Contents
PHD2 Calibration
Before PHD2 can effectively guide your mount, it needs to do a calibration. This is basically testing how your mount is responding to guide signals from the software.
The good news here is that you really only need to do this once. By default, PHD2 should remember your previous calibration and apply it next time you connect your equipment.
This is the case as long as you connect to the same PHD2 profile and don’t disconnect or move your guide camera relative to the guide scope.
When you do your first calibration, you must do it in the right part of the sky. PHD2 states that you should calibrate within 30 degrees of Dec 0.
The ideal spot is the intersection of the meridian and the Celestial Equator.
If you are having a hard time figuring out where this is, I would recommend downloading Stellarium.
Using Stellarium will also make it easier to find the coordinates of a star in the area. Then all you need to do is slew to the star before you calibrate.
As soon as you do a calibration the first time, it’s important to review your graph and make sure that it calibrated correctly.
Sometimes PHD2 will just proceed with an ugly calibration without telling you a thing. If you just assume, you will be none the wiser and will likely have sub-optimal guiding as a result.
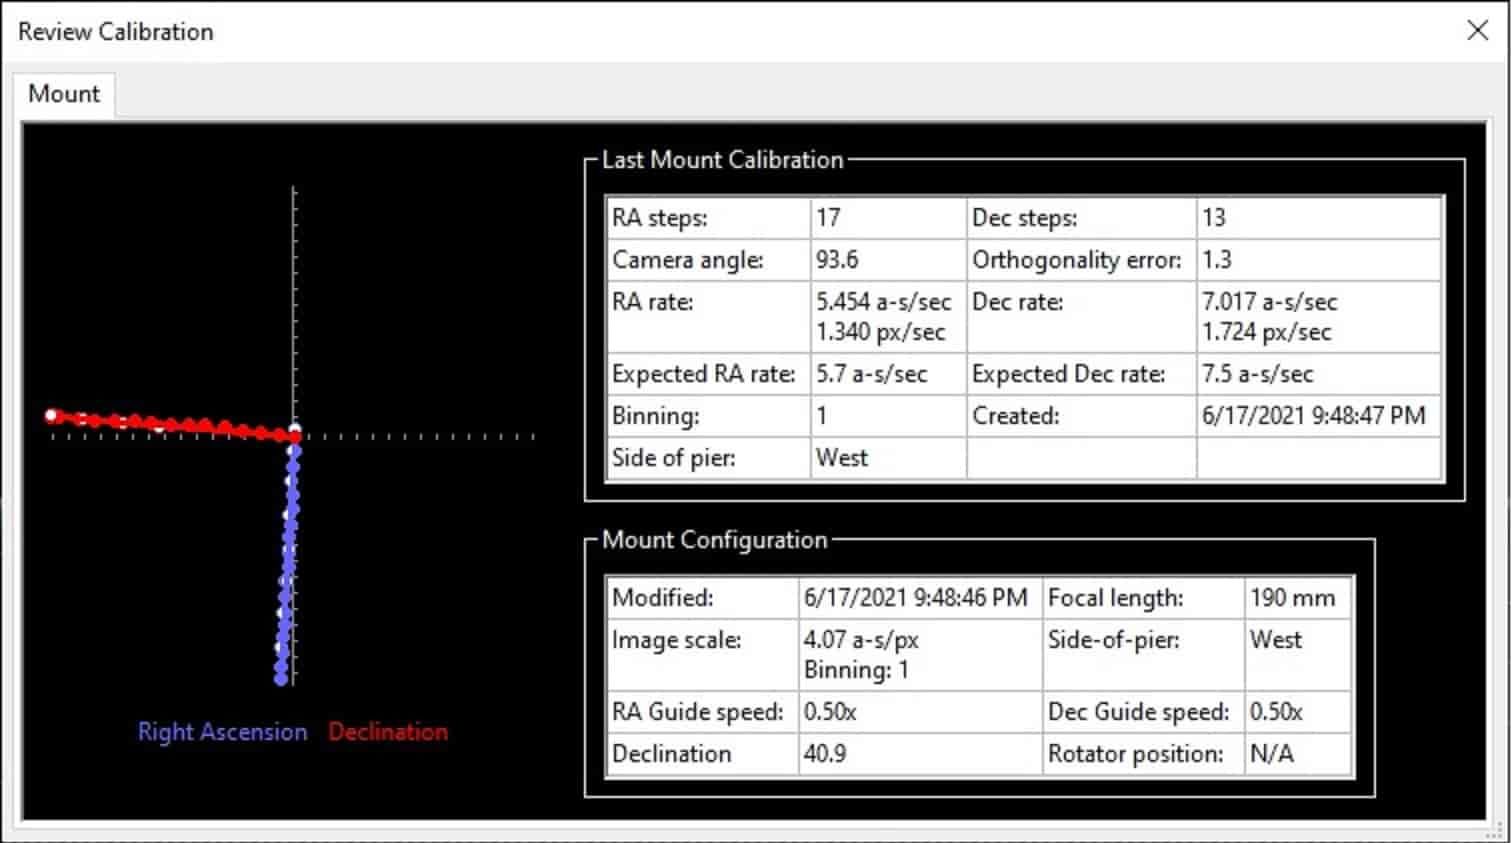
Let’s take a look at what the calibration graph looks like.
This can be accessed in the top menu under tools and review calibration data.
I will go through all of the essential information on this calibration and explain what each variable means.

A certain margin of error here tends to be okay. However, some items are telltale signs that something is wrong with either your equipment or a setting.
The Calibration Graph
The first thing we want to look at here is the graph on the left. This is representative of what I would consider to be a pretty good calibration.
What you are looking for is a right angle on this graph with reasonably straight lines. I have never known it to be an issue if the lines don’t match up with the X and Y axis on the graph, as long as they are straight.
On the other hand, if your calibration results look more like a scatter chart, something went wrong. In this case, you want to re-calibrate before proceeding with your guiding.
The Number of RA and Dec steps
Generally speaking, these two numbers should be between 8 and 14 steps in each direction, according to PHD2’s website.
As I mentioned, a slight margin of error is acceptable as long as it doesn’t affect your guiding. If these numbers are wildly outside of the range mentioned above, there’s a good chance your calibration will fail altogether. I will touch more on this later.
RA and Dec Rate
The numbers on your chart may not be the same as mine, as they are mainly dictated by your guide rate. My guide rate here was set to 0.50x.
If there is a major difference between the actual and expected rates, there is an issue somewhere.
Most of the time, the issue is that your guide rate in PHD2, and the guide rate in your ASCOM software don’t match. This is a problem that needs to be corrected before you proceed with your guiding.
If the difference you see is only in your Dec rate, this is likely backlash in your mount. Before you resort to opening it up and tuning it, make sure to run the Guiding Assistant.
Both of these topics are covered here in 9 tips on how to improve PHD2 guiding.
Declination
This is the declination of where my scope was pointing when I did the calibration; as you can see, mine was not within 30 degrees of the celestial equator. Whoops.
My guiding was still pretty good in this case, but it’s a good idea to stay within the PHD2 guidelines now that you know what they are.
Focal Length
This is the focal length of your guide scope.
It’s not the diameter of the guide scope, and it’s definitely not related in any way to your main scope unless you are using an off-axis guider.
If this is wrong, it’s probably going to cause the following error that I will discuss.
Calibration Failed- Star did not move enough.
If you are getting this error message, it’s likely because you have your guide scope focal length or your guide camera pixel size set incorrectly.
Both of these numbers absolutely must be correct. PHD2 needs these two numbers to calculate the image scale of your guiding equipment. It uses the image scale and the calibration distance to calculate the correct value for the calibration steps.
When these settings are wrong, the calculation for the calibration steps is also going to be incorrect. As a result, the star will likely not move enough, and your calibration will fail.
To check these settings, click on the brain in the bottom left-hand corner and click on guiding.
If you realize that your focal length is incorrect and change it, make sure you still click on advanced.
If you don’t click advanced to open the calibration calculator, it will not re-calculate the correct calibration steps. If the calibration steps are left unchanged, the problem will persist.
Conclusion
PHD2 is a fantastic piece of guiding software and is pretty easy to use once you have it set up correctly.
Before you can start guiding, you need to make sure that your settings are correct and calibrate properly.
The vast majority of PHD2 guiding issues are caused by one of the three following things:
- The guide rate in PHD2 doesn’t match the ASCOM software guide rate
- The guide scope focal length is set incorrectly
- The guide camera pixel size is set incorrectly
Sources: https://openphdguiding.org/man-dev/Advanced_settings.htm
1 thought on “How To Do A Proper PHD2 Calibration”
Comments are closed.