If you are trying to get the most out of your astrophotography images you may be looking in to dithering, and how to make it part of your imaging routine.
You may have even heard the term “dither or die” which as it turns out, is a saying for a very good reason. In this post I am going to explain what dithering is, and how you can still dither even without autoguiding.
I am also going to explain how to dither without guiding non ASCOM compatible devices such as the Skywatcher Star Adventurer, which just recently became possible.
Table of Contents
What is Dithering?
In deep space astrophotography long exposures are required to bring in faint signal from targets that are sometimes millions of light years away.
When you take long exposures, various types of noise that are inherent to every cameras sensor begin to manifest in ways that they normally wouldn’t with very short exposures. This includes:
- Hot pixels
- Fixed pattern noise
- Banding on certain canon cameras
With dithering, your mount moves the telescope randomly from its current position by a certain number of pixels every few sub exposures. The idea is that if the telescope keeps moving to various random positions, it will be guaranteed that each new piece of data you collect will fall on a different pixel.
This allows the stacking software’s rejection algorithm to remove outliers that are not consistent in your other exposures. This also works to remove things like satellites and airplane trails from your images.
Our end goal after stacking all of our images is to create one master frame with a dramatically improved signal to noise ratio compared to an individual exposure. If we choose to not dither, the noise mentioned above can also appear in our final master image which we obviously don’t want.
The need for dithering compounds when you image without guiding or have high levels of backlash in your mount. When either of the two of these are true, your target can actually begin to drift across the frame over the course of your imaging session.
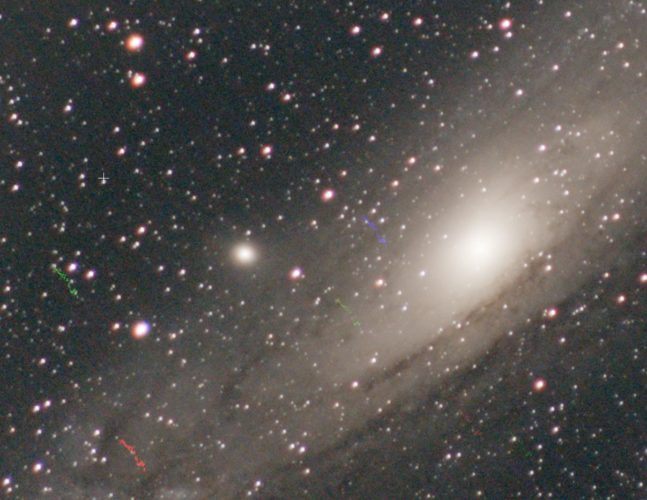
Take a look at the example image below which I took unguided and without dithering. You will notice that there is a brush stroke effect taking place in the background of the image as well as the appearance of red, blue, and green streaks.
These are both hot pixels and fixed pattern noise that have begun to walk across the image as the target drifted from left to right. You can actually see how far the target drifted as measured by the beginning and end point of the blue and green streaks.
This is commonly known as “walking noise” and some have even called in raining noise. This is because its effect can actually make it look like its raining in the background of your image.

The traditional way of dithering with guiding
Traditionally dithering is done in coordination with guiding and is itself, a function of guiding software.
The PHD2 guiding software is the most commonly used and it can communicate with many different programs for image acquisition. This includes some of the more well known names such as NINA and APT.
The process works in the following way:
- You set your image sequence in your acquisition software.
- You set a dither interval and scale for how many pixels you’d like it to dither.
- The acquisition software periodically pauses and sends a dither command to PHD2.
- PHD2 dithers and the acquisition software resumes imaging once the mount has settled.
In other words PHD2 needs to physically execute the dithering operation if you’re guiding. This is because your acquisition software cant just randomly move the position of your mount, without first letting PHD2 know it’s doing so.
Remember that guiding is used to counteract adverse movements and track your target as smoothly as possible.
How to dither without guiding
Up until recently you needed an ASCOM compatible mount in order to execute dither commands without guiding, from your image acquisition software. ASCOM is basically a platform of computer drivers that allows almost any piece of astronomy equipment or software to communicate with one another.
More eloquently put, here is a quote from ASCOM’s website explaining how it works:
“Both Alpaca and Classic ASCOM seamlessly operate in the background of many of the products you are currently using. Both provide the same universal language so that any astronomy app/program can connect to any astronomy device which complies with the ASCOM standards.”
Source: ASCOM – Standards for Astronomy
Recently however, Skywatcher made some huge upgrades to the firmware on its non ASCOM compatible Star Adventurer Mini, and its Star Adventurer 2i that allow you to dither with no PC connection or other software necessary (other than the initial install).
How to dither without guiding with a Star Adventurer
As noted, as far as I know this only works with the Star Adventurer Mini and the new second generation full sized Star Adventurer, which is the 2i model. Even though the older generation mount is capable of it, for whatever reason it seems as though Skywatcher has chosen to not make that option available at the time of writing this.
What You will Need
- A PC or Android phone
- A USB A-Male to Mini-B Cord (optional)
- A 2.5mm remote shutter release cable (SNAP cable) that’s compatible with your camera
Step 1: Download the Star Adventurer Console Application which can be found here Sky-Watcher | Sky-Watcher Global Website (skywatcher.com) . If you have an android smart phone you can use the phone app, and if you don’t then download the most recent stable windows version of the console.
Step 2: Open the Star Adventurer Console Application on either your PC or Android phone.

This is where you will want to enter the exposure and dithering parameters.
Exposure: How many seconds you would like the shutter to remain open for each sub exposure.
Tip: I would recommend taking some test shots ahead of time and looking at the histogram on your camera.
Since you wont be able to adjust this in the middle of your imaging session, its a good idea to know what the ideal sub exposure time is for your skies. This is especially true if you are in an area with heavy light pollution.
If you are and you don’t do this ahead of time, you run the risk of overexposing all of your images.
Interval: if you would like to let the camera sensor cool down in between exposures this is where you would enter that information. Otherwise its going to wait one second by default in between each exposure.
Tracking Rate: Leave this setting at sidereal since you will be doing your imaging at the sidereal tracking rate.
Dithering Range: This setting tells the mount how far it is allowed to dither in arc minutes. We can dither fairly aggressively without having to worry about the potential negative effects it may have on our guiding, because we aren’t guiding.
We are going to need to do some math here, so hang in there with me. First you need to calculate your image scale which is (The pixel size of your camera / the focal length of your optics) * 206.3.
For my telescope and camera combination that number is 2.21. Then you multiply this number by the number of pixels you want to allow it to dither, and divide that number by 60 to convert to arc minutes.
So if I wanted to allow a 20 pixel dither it would be (2.21 * 20) / 60 which equals .73 arc minutes.
Step 3: If you would like to save this profile to the console for later use click “save”. Next click “run” which will sync the settings to the device.
Step 4: Set up your star adventurer as you normally would and connect the camera to the Star adventurer with the SNAP cable previously mentioned in the “what you will need” area.
Now when you turn the dial to sidereal, the camera will begin the imaging session the way you specified in the console.
Tip: because you will still need your Star Adventurer to track while you frame your image and focus the camera, use the solar setting. This will be close enough to sidereal to allow you to focus and frame.
The Star Adventurer mini and 2i should come with the most recent version of the firmware, which is necessary to enable dithering. If for any reason the steps above are not working, proceed to steps 5-7 below.
Step 5: Download the most recent firmware for your Star Adventurer on Skywatcher’s website here:Sky-Watcher | Sky-Watcher Global Website (skywatcher.com)
Select the appropriate firmware and download it. Note that for dithering you must be on 3.10 or higher, at the time of writing this 3.14 is the most current version for the Star Adventurer 2i.
Step 6: Click on “motor controllers” on the left hand side of the page or click here: Sky-Watcher | Sky-Watcher Global Website (skywatcher.com)
Here you want to download the most recent version of the “motor controller firmware loader”. If you’d like to install the firmware via WiFi vs the USB cable, download the WiFi Version.
Step 7: Open the motor controller firmware loader software and find the location of the firmware that you previously downloaded. Once you have done so, click update. Note that you will see the directional arrow buttons on the star adventurer blinking as the firmware updates.
Conclusion
Proper dithering can dramatically improve the quality of your photos by removing unwanted noise in the stacking process.
It is traditionally executed through guiding software like PHD2 which is a great way to do it if you have guiding equipment.
When you first begin your astrophotography journey you may not have all of the equipment needed to dither the traditional way. This is why Skywatcher’s new firmware update and console app is a major development, and a true game changer for anyone using a Star Adventurer 2i.
Additional Resources
Why and How to Dither Your Astro Images – Sky & Telescope – Sky & Telescope (skyandtelescope.org)
3 thoughts on “How to dither without guiding”
Comments are closed.