There was once a time long ago when there weren’t a lot of polar alignment options for people that didn’t have a complete astrophotography rig.
A time when it took an eternity to polar align your mount if you lived in the Southern Hemisphere.
The time that I’m referring to was way back in the beginning of 2019.
Ok, so it really wasn’t very long ago at all where many people were left high and dry trying to polar align their mounts.
There have however been some really neat advancements in technology recently that are game changers for people that are starting astrophotography with basic equipment.
What’s great about this technology is that it’s actually on the software side rather than the hardware side, and it doesn’t cost anything to use.
There are a number of reasons why you may be struggling to polar align your mount, especially if you are using a DSLR with no guiding equipment.
If this sounds like you, you’re going to want to stick around and keep reading.
In this post I am going to talk about a relatively new software driver that will finally allow you to use Sharpcap with a DSLR to polar align your mount.
This means that you will be able to achieve excellent polar alignment, with beginner equipment, even if you don’t have a polar scope or live in the southern hemisphere.
Table of Contents
Why couldn’t you use a DSLR with Sharpcap until now?
For whatever reason up until recently there has never been an ASCOM driver for Canon or Nikon DSLR cameras that worked well with Sharpcap.
The Ascom Platform in a nutshell, is a collection of drivers for different astronomy-related devices. It uses agreed standards that allow different computer programs and devices to communicate with each other.
All of the major manufacturers of things like auto-focusers, cameras, filter wheels, etc. have ASCOM drivers for their hardware. These drivers allow you to control them from a single piece of image acquisition software on your computer.
Because this DSLR driver didn’t exist for use with Sharpcap, someone in the astrophotography community actually created one for his own use and then released it for others to use as well.
I personally downloaded and tested out all of the software myself, and I was able to get my camera connected to Sharpcap in a matter of minutes.
It’s worth noting that the particular camera you are using may dictate to a certain extent, whether or not this will for work for you.
The Camera that I used for this test is a Canon SL2 which is newer, but by no means a part of Canons latest lineup.
As a side note, at the time of writing this it appears that this only works for Canon and Nikon DSLRs.
What do I need to connect my DLSR to Sharpcap?
Not much actually.
The only thing that you will need other than a laptop and your camera is a USB A-Male to Mini-B cord. This is a pretty common cord so look around before you buy one. If you’re anything like me you may have a drawer full of them somewhere.
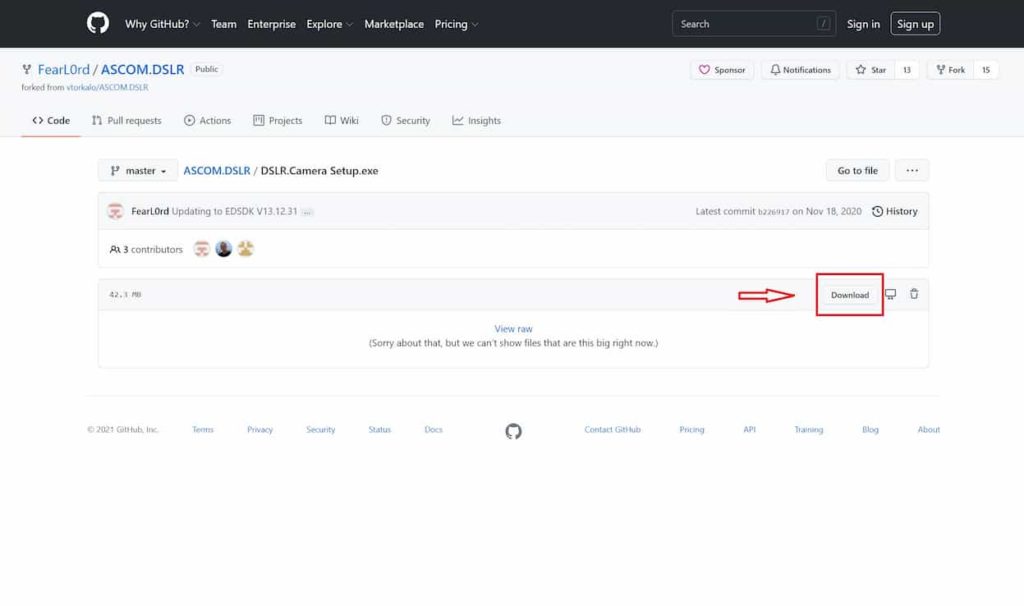
Step 1: Download the ASCOM Driver
The very first thing that you need to do is download the ASCOM platform. You can do so at their home page Download Center (ascom-standards.org) by clicking the download button in the upper right-hand corner.
Step 2: Download the most recent version of Sharpcap
You can do this on their website here.
If you want to use the Polar Alignment feature then you will have to upgrade to the Pro version, which costs about $15 per year. If you don’t already have the Pro version, it’s probably a good idea to make sure this will work with your camera before you purchase it.
Step 3: Download the ASCOM DSLR driver
Once you do so here, install it on your computer.
Step 4: Connect Your Camera
Plug your camera in to the com port on your computer using the USB cable previously mentioned. Turn your camera on and set it to manual mode.
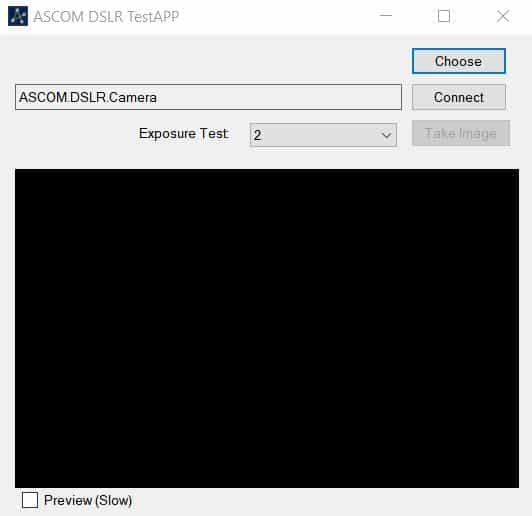
Step 5: Open the Driver Interface
Open the driver via the icon that it installed on your desktop. In the top right corner click “Choose”.
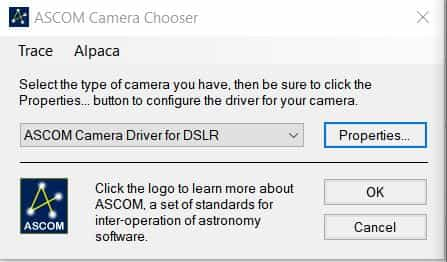
Step 6: Choose the Correct Driver
Make sure “ASCOM Camera Driver for DSLR” is selected and then click on properties.
Step 7: Configure Your Settings
These are the settings that I used which seemed to work well. If you are using a Canon camera, make sure “CanonSdk” is selected under connection method, and select the Nikon variant if you are using a Nikon camera.
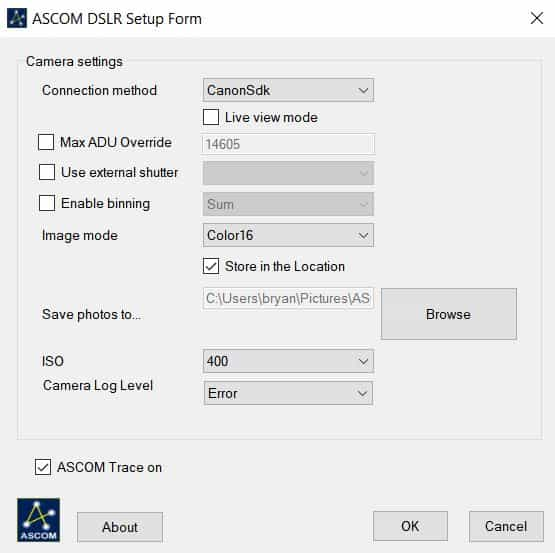
The ideal ISO setting here will depend on what camera you are using as each camera has a different optimal ISO. If you aren’t sure what that is for your camera, click here.
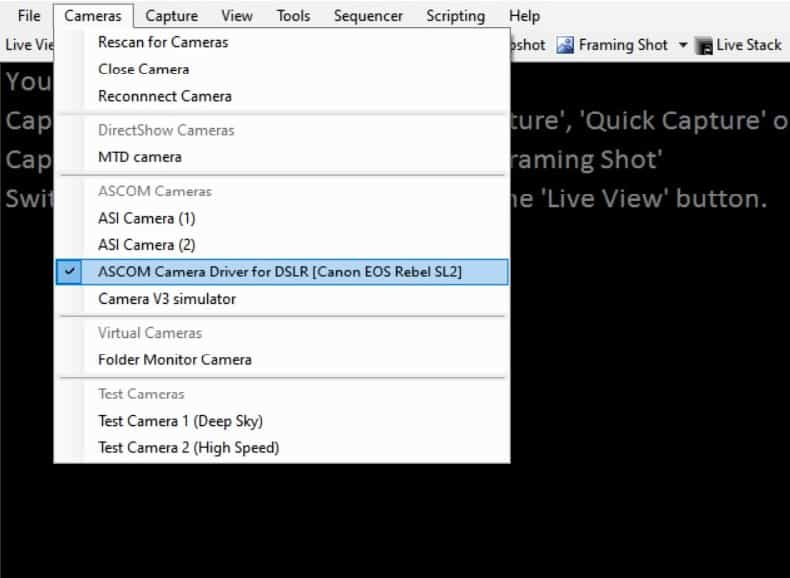
Step 8: Connect the Camera to Sharpcap
Open Sharpcap, click on cameras, and scroll down to where it says “ASCOM Camera Driver for DSLR”. Select this option to initiate the connection with the camera.
Once your camera is connected you may need adjust the settings for your exposures. I also found that putting the camera in to live view helped reduce the vibrations from the shutter activating.
Conclusion
Until recently DLSR users without dedicated guiding equipment were left with little to no options when it came to polar alignment assistance.
This is particularly problematic for people that don’t have a polar scope or live in the southern hemisphere.
Luckily there is now an ASCOM driver for Canon and Nikon cameras that seems to work reliably with the most recent version of Sharpcap.
Using Sharpcap with a DSLR can be done in just a few simple steps:
- Download the ASCOM Platform
- Download the latest version of Sharpcap
- Install the DSLR ASCOM Driver
- Connect your camera in Sharpcap under the “Cameras” section