When you first purchase a telescope, there will likely be a bit of a learning curve in using it at first.
One of the most common things I hear is that people have trouble finding and focusing their telescope on the object they’re looking at.
In this post, I will discuss how to focus a telescope for both visual and astrophotography purposes.
Table of Contents
Focusing for Visual
When it comes to visual astronomy, there are a few things that you want to be mindful of when you are trying to focus your telescope.
The first thing is magnification. Magnification is a product of two variables; the telescope’s focal length and the eyepiece’s focal length that you are using.
If you are using too much magnification and trying to focus on a terrestrial object (one on Earth rather than in space), you may never be able to reach focus.
Calculating Telescope magnification
The calculation for determining the level of magnification for a specific eyepiece is pretty straightforward.
It is the focal length of the telescope divided by the focal length of the eyepiece.
Let’s look at an example and say you use a very common beginner telescope- a Dobsonian.
The focal length of an 8-inch Dobsonian telescope is usually 1200 mm. Therefore, if you insert a 6mm eyepiece into the receiver, you will be looking at objects with a 200x magnification.
In other words, this level of magnification is what you would use for a close-up view of the planets.
To put this into perspective, Jupiter is 463 million miles away from Earth.
If you try to focus on a streetlight on your block at 200x magnification, you will never reach proper focus. The object is simply too close.
Aligning your Finderscope
Before you take your telescope out at night for the first time, you want to make sure your finder scope is aligned correctly.
If you don’t do this, you may have difficulty focusing because you will have no idea what you are actually focusing on.
This is easiest to do during the day, and what you are trying to achieve is making sure that your finderscope and your primary telescope are pointing in the exact same direction.
While the sun is out, choose a low power (longer focal length) eyepiece and insert it into the eyepiece receiver. Point your telescope at a terrestrial object or the moon if it happens to be out.
Make sure that the focuser is not locked; sometimes, they will come from the factory this way. There will be a screw next to the focuser that can be twisted counterclockwise to make sure that the focuser is not locked and can move when you twist it.
Locate the object off in the distance and twist the focus knob until you can clearly see what you are looking at.
Lock the telescope into position by twisting the trunnion knobs on either side of the Dobsonian to ensure that it doesn’t move from its current position.
Adjust the screws on the finder scope until you see the same object you were just looking at through the eyepiece.
Once you have done this, the finder scope will be properly aligned with the main telescope. Then, when you take your telescope out at night, make sure you are on target with your finder scope before focusing.
If you don’t do this ahead of time, you may have issues focusing because you’re actually looking at a tree when you think you’re looking at Saturn.
Prime Focus Astrophotography
Focusing a telescope with a camera can be a bit trickier than focusing with an eyepiece for visual purposes.
If you are using a Dobsonian telescope in particular, you likely won’t be able to achieve prime focus without a Barlow. This is because the focal point will be too far away due to the positioning of the internal mirrors.
This is also why companies like Skywatcher make “p-ds” models of their Newtonians, specifically designed to reach prime focus with a camera.
If you attach a DSLR to a Dobsonian, you will likely need a modified focuser to bring the camera sensor closer to the secondary mirror.
The other option is to use a Barlow lens, which will work well for planetary imaging.
If you are using a Maksutov telescope, you likely won’t experience the same issues focusing. This is because twisting the focus knob is actually moving a secondary mirror back and forth inside of the telescope.
This greater range of mobility should resolve the issue that you will experience using a Dobsonian.
Focusing with a Bahtinov mask and a DSLR
If you are focusing for astrophotography, a Bahtinov mask is one of the best ways to make sure you nail your focus.
They are cheap and are often 3d printed by those that own their own 3d printer.
Bahtinov masks work by focusing on a bright star and taking short exposures with your camera. Using this mask will create diffraction spikes on the star in an X pattern.
Take a look at the example image below. Can you see the differences between them?
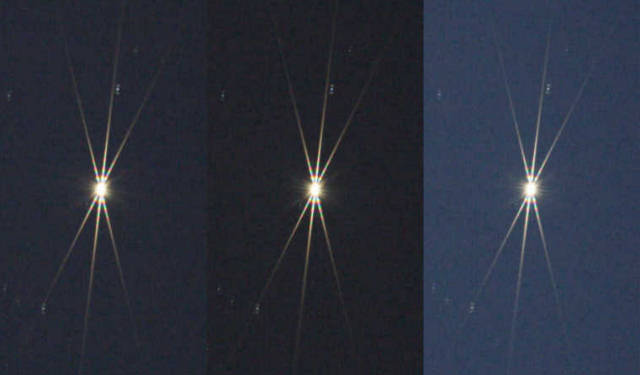
They may look the same at first, but subtle differences will determine whether you are in proper focus.
Look at the center spike relative to the other spikes on the left and the right. In my opinion, it’s easiest to just focus on the top spikes.
The two images on the left and the right are out of focus. You can tell when you look specifically at the area where the spikes meet the star.
The center spike should never touch either of the other two, just as it is perfectly centered in the middle image.
Once you have your focus perfect, you are ready to slew to your target and begin imaging.
It is worth noting that you will need to periodically refocus, especially if you are using a refractor.
This is because temperature changes also lead to focus shift. So pay attention to the temperature outside and how much it is projected to fluctuate from the time you start imaging to the end.
I like to refocus with every couple of degrees change in temperature. If you don’t do this, you will end up stacking many photos that are not in focus which will lead to a blurry image.
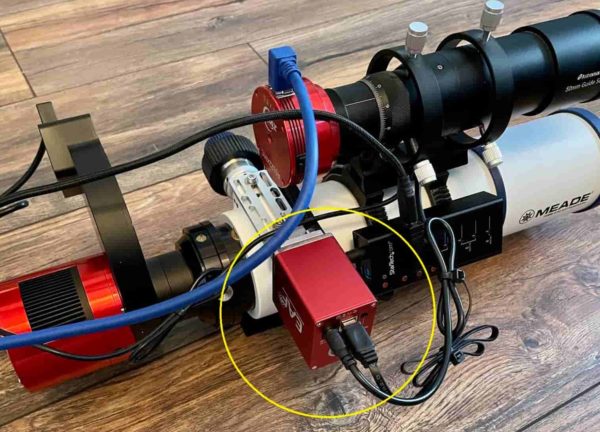
Telescope Auto focuser
Auto focusers are a beautiful thing, and perhaps the biggest quality of life improvement money can buy for astrophotography.
These work by attaching an electronic device to the knob on your focuser. The imaging software you use will periodically examine your stars and refocus for you as needed to keep them sharp.

Let me explain how I did my imaging before I started using one of these.
I would first focus with a Bahtinov masked as described earlier. Then, I would slew to my target and plate solve to make sure it was centered.
After that, I would come back every hour, slew away from the target to a bright star and refocus. After refocusing, I would slew back to my target and plate solve before resuming imaging.
Sometimes I would do this 4 or 5 times throughout the night in the freezing cold. Unfortunately, this also means that I had to stay awake the entire time I was imaging.
Now that I have my auto focuser, my image acquisition software (NINA) automates the entire process. This means I can actually get a bit of sleep if I want to.
These focusers typically cost a couple hundred dollars. While this isn’t cheap, it’s not exorbitantly expensive when you compare it to the overall cost of this hobby in general.
Conclusion
If this is your first time using a telescope, ensure that your finder scope is aligned correctly and that you aren’t using too much magnification to focus on an object.
When it comes to astrophotography, you may need a Barlow lens to focus with a Dobsonian telescope. This will work well for planetary, and you shouldn’t be using a Dobsonian telescope for deep space astrophotography anyway.
There are imaging Newtonians specifically designed for prime focus and to be used on an equatorial mount.
Auto focusers are a significant quality of life improvement if you are doing long exposure astrophotography and don’t want to refocus every hour.
If you aren’t ready to go that route for focusing yet, Bahtinov masks get the job done too. They can be purchased for relatively cheap or 3d printed for even less.